

Tech Pack Mastery: The Ultimate Guide to Building a Tech Pack.
Explore how we manage the most important document in apparel design and development.

Topics
📄 What actually is a tech pack and why do we need it?
🧵 Fabric and trim spec - what information does it require?
📐 Why the measurement chart is so important
💻 CAD drawings and why they need to be in the tech pack
🎨 Colours and the importance of keeping them updated
The tech pack is the most important document in the design and development process, especially for a product developer. A great tech pack will result in a better and more efficient sampling process as it ultimately forms the link between concept and first prototype.
Although tech packs are a necessity, there is not a set template when it comes to them. So, what needs to be included? This article aims to share what a tech pack is, the key elements, and how to manage it internally.
What is a tech pack?
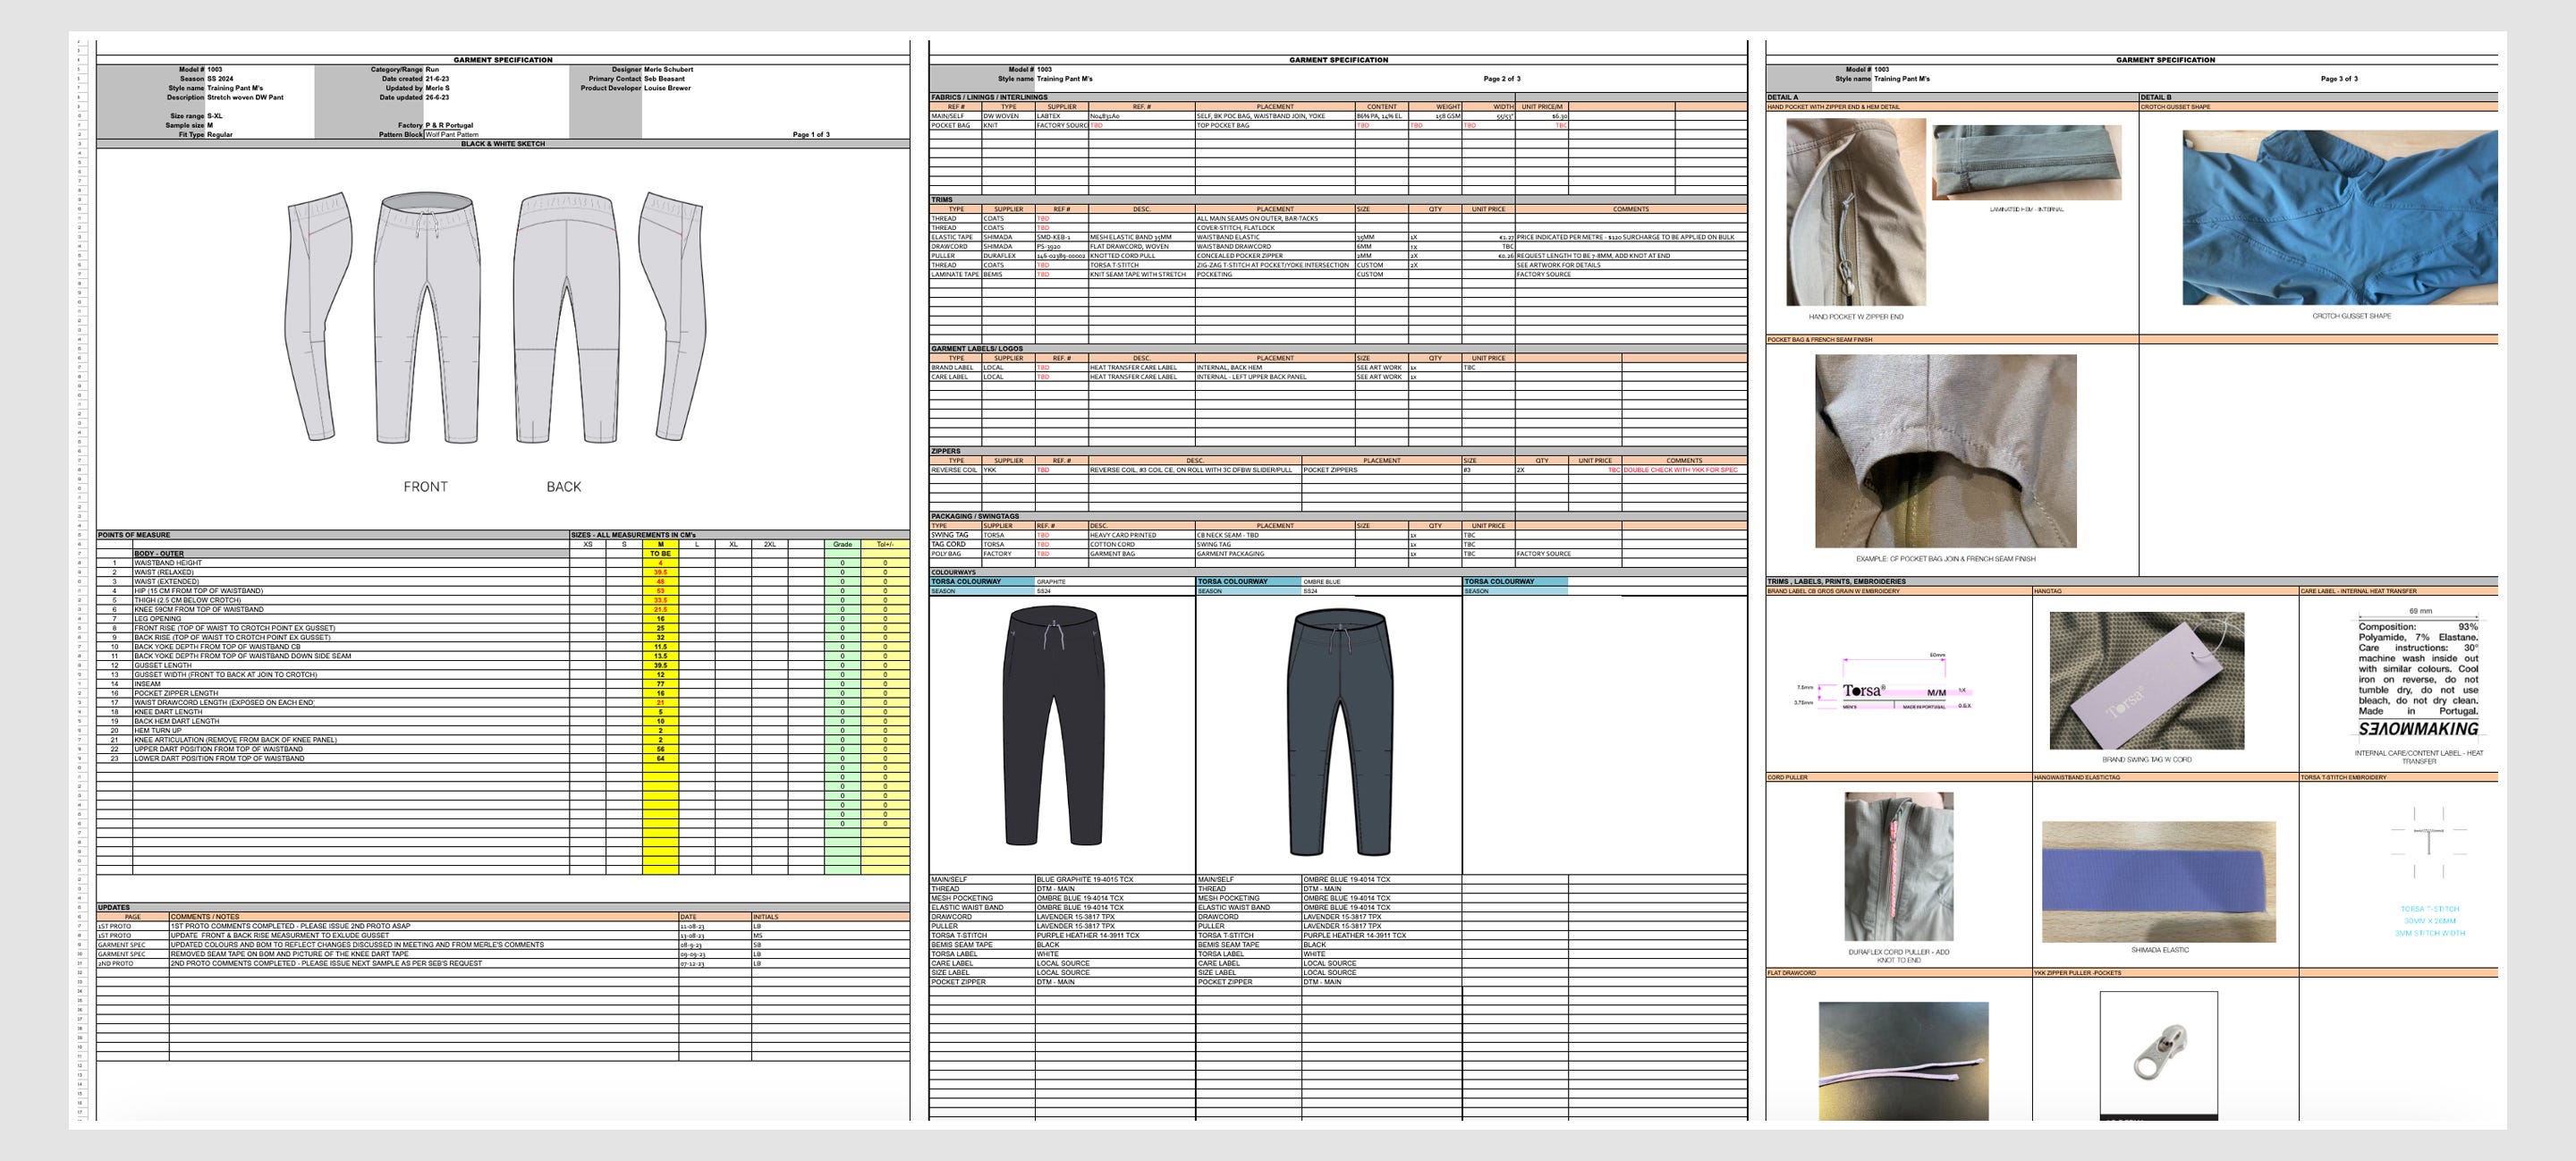
The term tech pack is used to describe and illustrate the information and subsequent visuals needed for a factory to translate your designs into finished products. The best way to describe a tech pack is like a blueprint for your garments. It contains all the necessary information such as fabric, trims, suppliers, costs, sketches, colours, measurements and so on.
Your role is to provide a clear source of information which can be easily interpreted by your manufacturer, with the aim of maximising accuracy and minimising error.
What goes into a tech pack?
Tech packs are traditionally broken up into sections. There is written content such as information about article names of fabrics and trims used, their corresponding suppliers, cost per metre, quantity, and so on. Then there is numerical information revised for the measurement chart (which i’ll touch on more detail later). Finally there are visuals such as the detailed CAD, colour way options, reference images and any artwork related to trims such as care label and brand label.
Fabric and Trim Spec
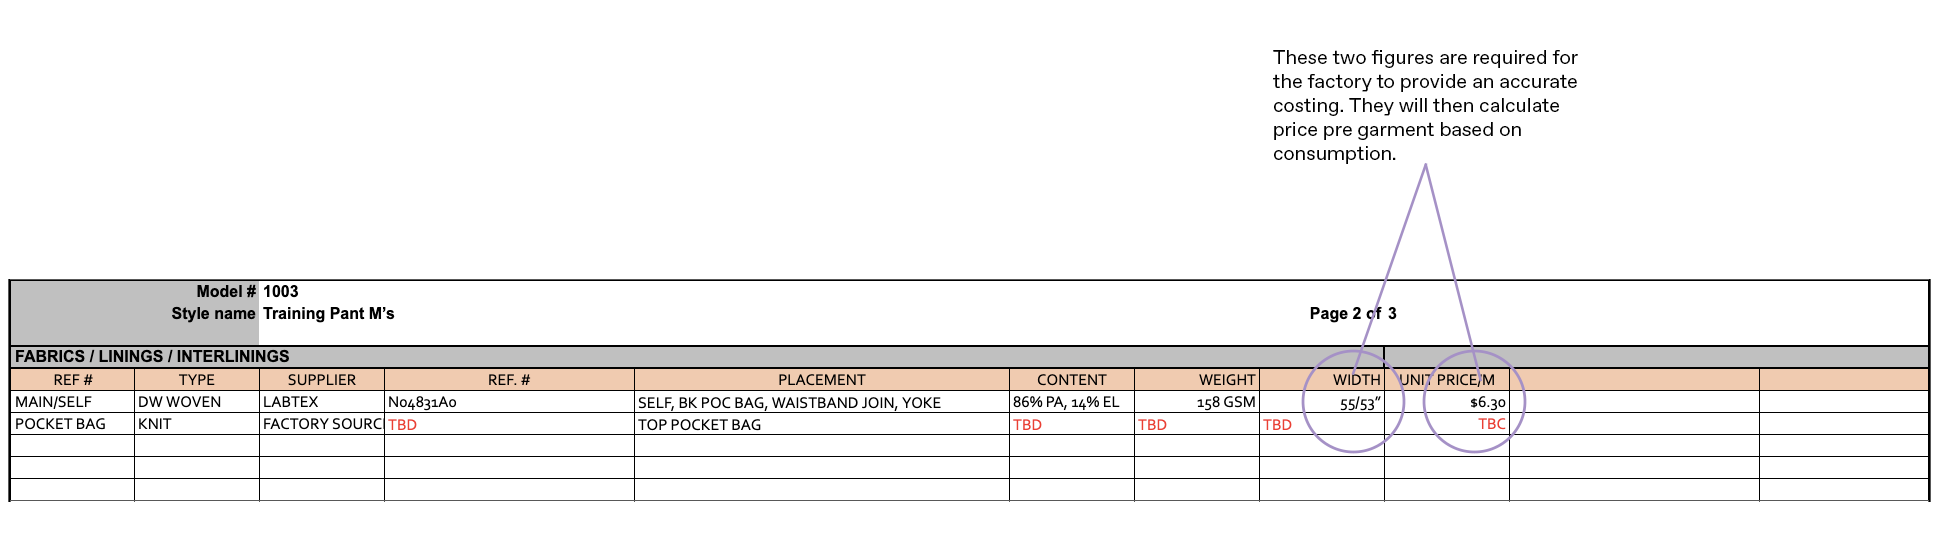
The fabric an trim spec contains all the necessary information related to the materials needed to construct the garment. In many cases, garments are going to use more than one fabric, and certainly more than one trim. I suggest splitting fabric and trims into two separate tables that can be clearly differentiated in-house, and by the factory. Remember fabric doesn’t just relate to the main body fabric; elements such as liners, pocket bags, and secondary fabrics should all be included in the fabric spec.

It’s also critical to provide all the relevant information that relates to those fabrics, such as supplier, article reference, placement (where that fabric should be used on the garment), composition, wright, width, and unit price.
Commercial information such as fabric price and width for example are critical for the factory in order to provide an accurate costing.
The trim spec follows the same pattern as the fabric spec. This contains all information regarding the trims used for the garment. Depending on the garment of course, but this could be elements such a drawcords, elastics, zipper pullers, and almost always contains thread. In some cases, brands may put zippers here as well - we have our own section for zippers, but it can certainly be included in the trims section instead.
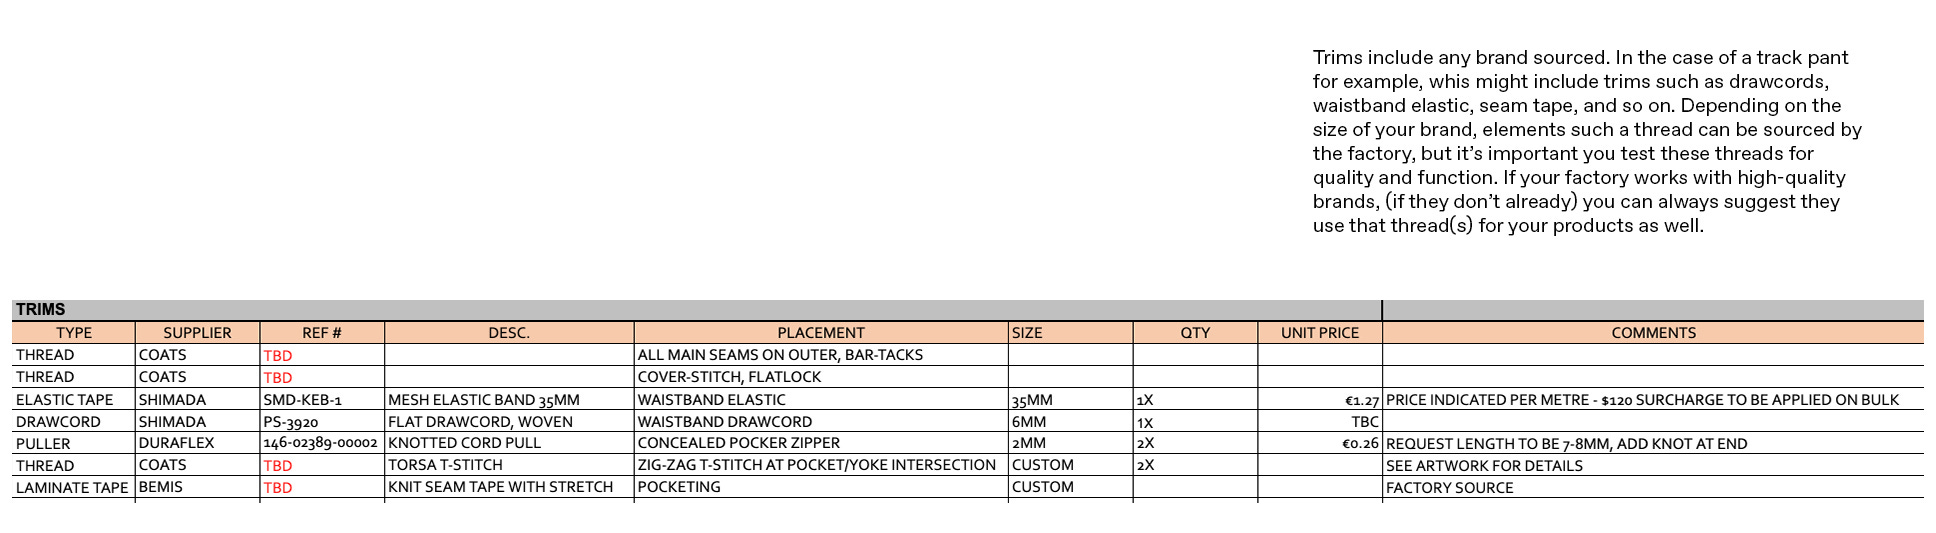
It’s important to remember, these specs need to be accurate as the factory is likely going to be ordering the fabric and trims on your behalf. To ensure the orders between your factory and suppliers are accurate, you have to make sure the tech pack specs are accurate and kept up to date.
As you notice from the above trim spec, we have noted TBD in some reference columns. This is because the factory will source it locally themselves or will use something in-house already. Once we have the information from them on the article reference, your product developer should update these columns in the tech pack accordingly.
Measurement spec
The measurement spec or POM (points of measure) is essentially the holy grail when it comes to sizing. You need a measurement chart to create the garments patterns (the pieces which make up the garment).
Garment patterns are traditionally made from pattern makers - either employed by the brand itself, or in-house at the factory. An example of a basic t-shirt pattern can be seen below.

The measurement spec is essentially a table with the garments key measurements in your sample size. In menswear, you’re sample size will usually be a medium or large. These measurements and corresponding patterns are then graded up and down to get the different sizes.

As you go progress through the sampling stage, the product developer will measure the first sample you receive from the factory against the original measurements you provided. This measurement chart will be updated on a completely new tab, usually named ‘1ST PROTO.’ I will touch on the progression of tech packs in another article.
CADs
One of the key visual references which needs to be included in a tech pack is the CAD. The CAD (computer-aided design) is simply the sketch of the garment that the factory will use to determine things like - if we were designing a track pant - style lines, articulation, trim placements, waistband finish, yoke placement, pocketing and so on. Although it appears simple, it’s actually very important.
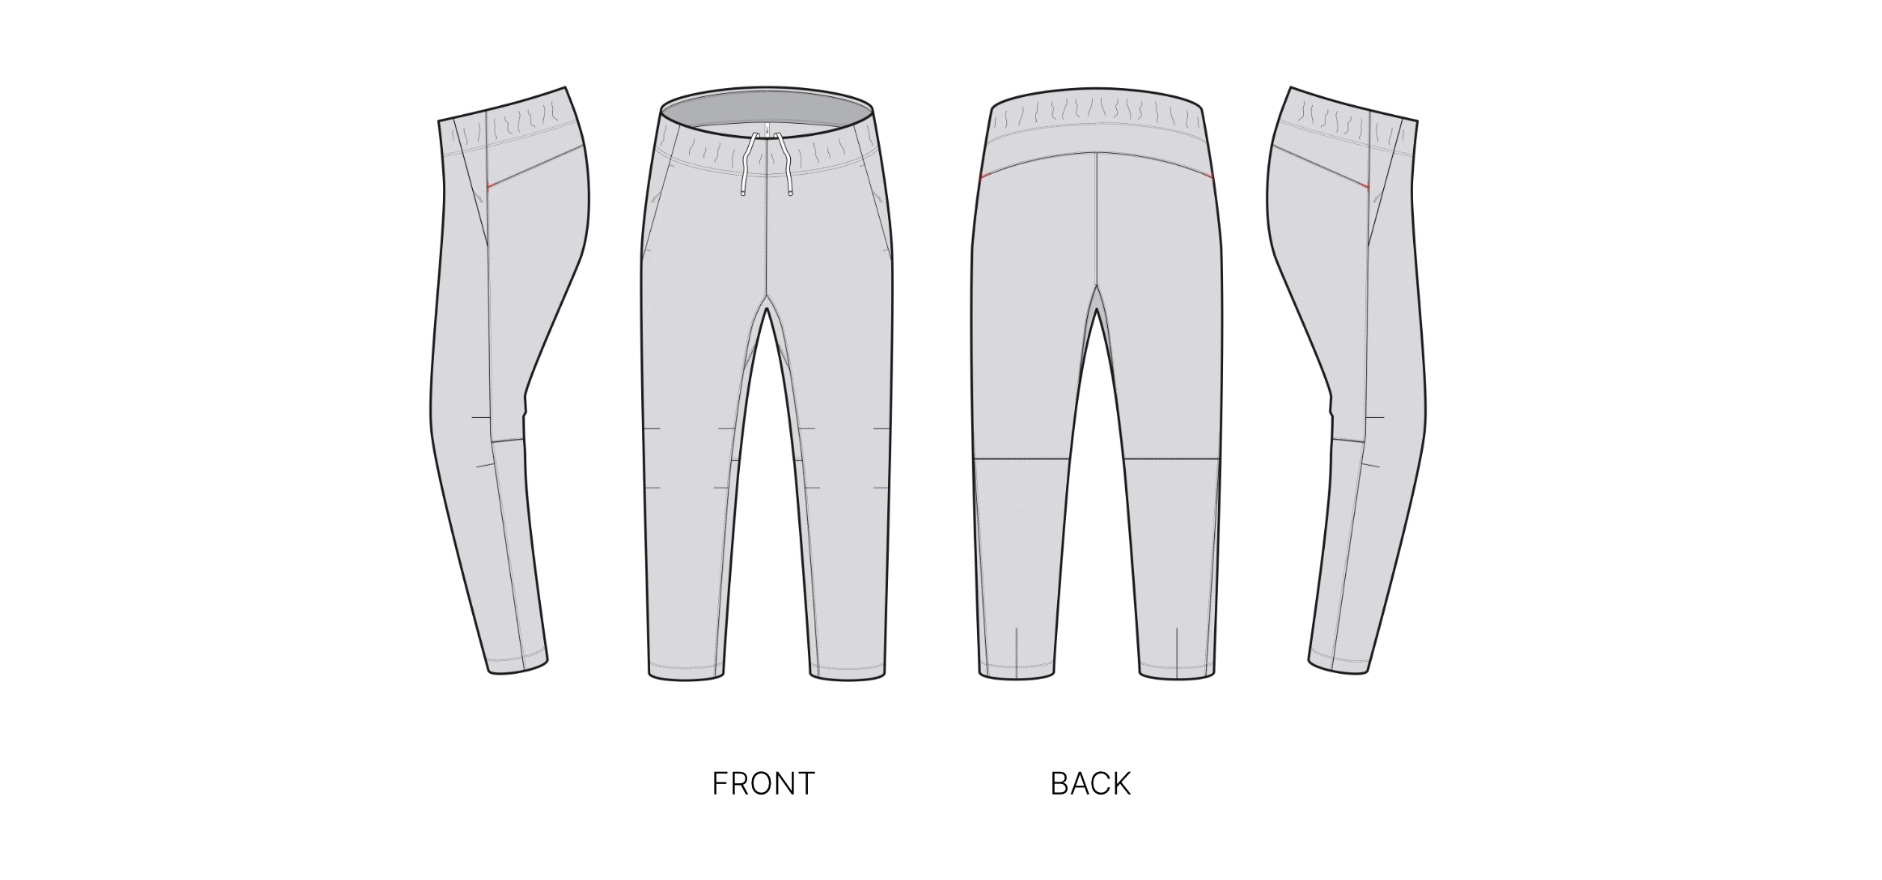
The CAD should be constantly updated as you progress through the sampling stage, with any minor adjustments noted on the sketch and updated in the tech pack.
During the sampling stage, you will have what’s called a design review with your designer to evaluate the first samples. This information will then be translated into a document similar to below highlighting all the changes needed, which the product developer will translate onto the tech pack, whether through comments on images on the ‘1ST PROTO’ page.

Colour Information
Information on colour is essential for the tech pack. The way we manage here at Torsa is having a section below the fabric and trim spec which highlights the different colour ways and their corresponding CAD drawings of the garment itself.
Below this comes the nitty gritty information - what colour the associated trims are which relate to that garment. In some cases, you may have two colour ways of a garment, but the trim colours (drawcords, zippers, mesh pocket, thread) may all be different based on the main garment colour itself.

This information is super critical to keep updated. If you’re agreement with the factory is FPP (full package production), they will be responsible for ordering the fabrics and trims (and their associated colours) on you behalf, and therefore they will use the info on the tech pack to place their purchase orders with suppliers. You should, of course, get trim colour strike-offs before confirming the final Pantone colour as these can vary based on material and trim.
Reference Images
The importance of clear and concise information is critical when talking with your manufacturers. Depending on the size of your brand, you may be working with manufacturers across the world, and communicating information effectively is key to the success of your sampling process, and ultimately, your final product.
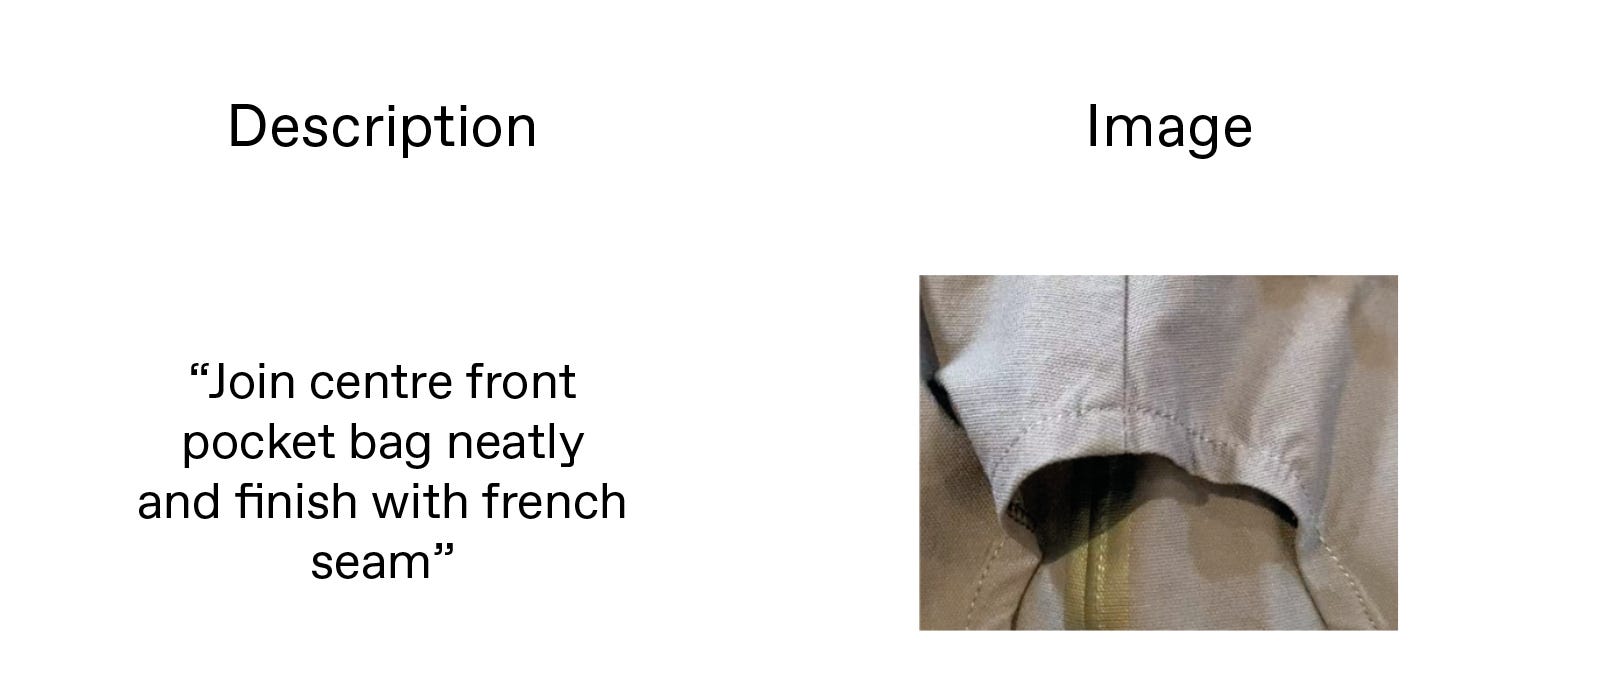
Reference images are a universal tool which all factories can understand. These can be used to demonstrate a specific detail, construction, pattern shape and so on. For example, for our AW24, we shared an image of the centre-front pocket bag join and french seam finish. If we had just written that down, it may have been misunderstood but sharing the image gives a much clearer indication of how we wanted the finish to be applied.
Bear in mind, you should have already had a passover call for each style with the factory before you proceed to first samples. This call should address things such as construction and detail elements that the factory may not be totally clear on, but reference imagery is invariably a great tool to have in the tech pack for the factory to reference if they remain unclear.

As the sample progresses, and you undergo design revisions, there may be elements of the design that changes. For example, you may get a costing back for the french seam finish and it’s too high, and therefore you have to update the design to use a flatlock or less costly alternative. In this case, the french seam reference image should be removed from the tech pack. You want to eliminate any confusion that the factory might have, and therefore keeping the reference imagery section up to date is an important consideration.
Final Thread
I hope this article has given you a clearer idea of what makes up the first page of a tech pack. I mention first page because as you start your sampling process, you will have new tabs on your tech pack which invariably follow your sample through its journey, with each page looking a little different from the last.

I will go into more detail about the sampling process, and how we manage the tech pack at a later date.
The tech pack really is the most important document when it comes to product design and development. It’s the blueprint which provides the information needed for your product to be made. Each tech pack will look a little different, but its important to make it as clear as possible for the factory to understand.
If you have any more questions about tech packs, please feel free to connect with me on LinkedIn here.